写程序时免不了遇到bug,而当bug发生以后,除了抓耳挠腮之外,一个常用的技术是单步调试。
命令行调试
Node.js支持命令行下的单步调试。下面是一个简单的程序:
1
2
3
4
5
6
| var a = 1;
var b = 'world';
var c = function(x) {
console.log('hello ' + x + a);
};
c(b);
|
在命令行下执行node debug debug.js,将会启动调试工具:
1
2
3
4
5
6
7
| < debugger listening on port 5858
connecting... ok
break in /home/byvoid/debug.js:1
1 var a = 1;
2 var b = 'world';
3 var c = function(x) {
debug>
|
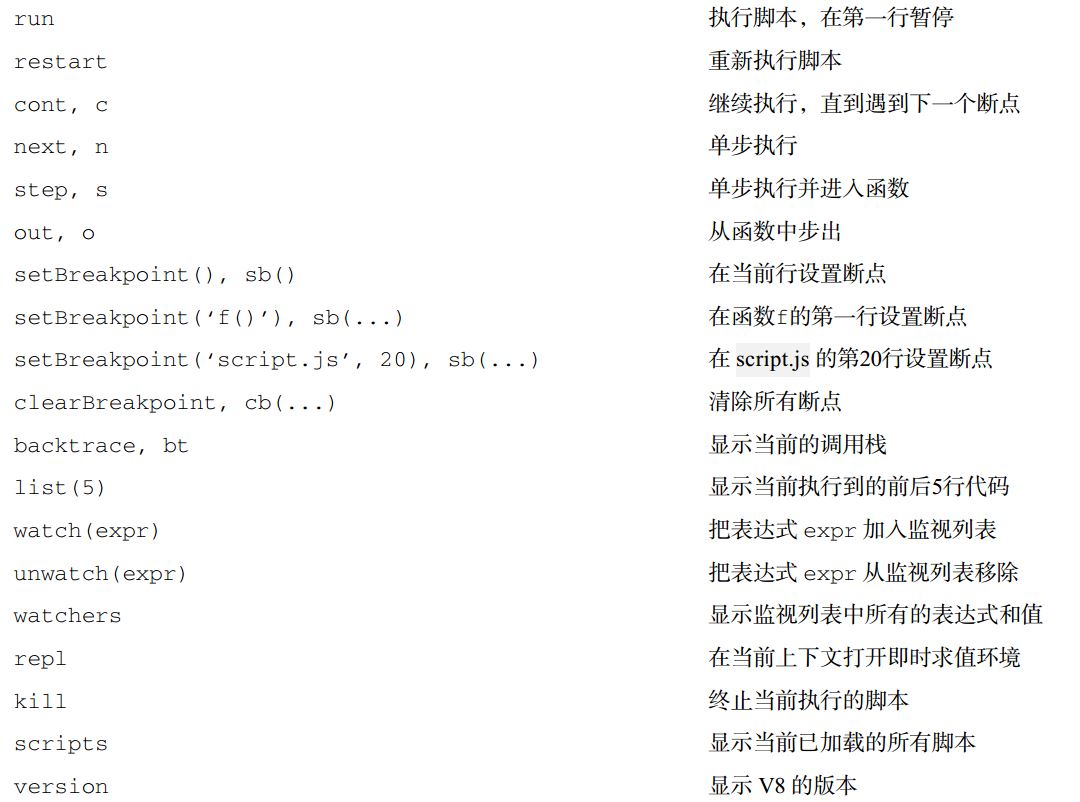
这样就打开了一个Node.js的调试终端,我们可以用一些基本的命令进行单步跟踪调试。
在VS Code中调试
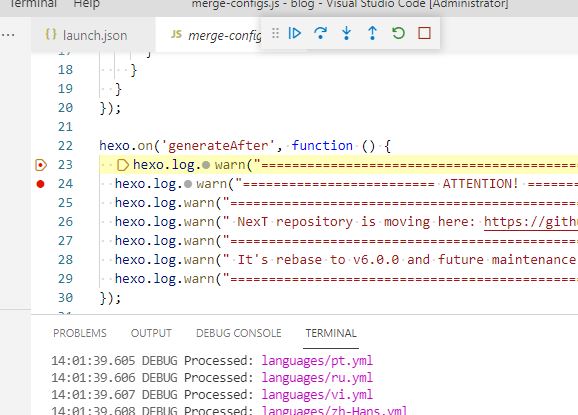
用VS Code打开程序根目录,按F5调试,选择chrome,打开launch.json。
修改launch.json文件如下:
1
2
3
4
5
6
7
8
9
10
11
12
13
14
15
16
17
18
19
| {
// Use IntelliSense to learn about possible attributes.
// Hover to view descriptions of existing attributes.
// For more information, visit: https://go.microsoft.com/fwlink/?linkid=830387
"version": "0.2.0",
"configurations": [
{
"type": "node",
"request": "launch",
"name": "node",
"console":"integratedTerminal",
"program": "${workspaceFolder}/node_modules/hexo/node_modules/hexo-cli/bin/hexo",
"args": [
"s",
"--debug"
]
}
]
}
|
配置console为integratedTerminal,调试时的输出就会打印到VS code控制台中。不配置该项时默认为internalConsole,并不会将控制台输出打印到VS Code控制台中,在调试过程中看不到任何输出。
配置program为需要启动的应用,这里图为hexo,这个Hexo是通过npm安装的,需要配置相对于Hexo目录的相对路径。
配置args为传递的参数,也就是运行程序指令时输入的各个选项。这里是用Hexo的指令,选择”g”,”s”或者”d”,都是可以的。
La amistad borra la lejanía.